Transfer Move Email Contents (IMAP)
Below is the guide on how you can easily Transfer Move Email Contents (IMAP) email account to another email contents or email accounts (IMAP). These steps can vary depending on the email client used.
- If your domain has not propagated to the new account, then you can set up your old account with your domain name, and your new account using your domain.
- Although this process is relatively easy it can take quite a bit of time to finish, especially if you have a lot of emails. Be sure to allow enough time for copying of all emails to the new server.
Alright, let’s begin! Please follow our guide below:
Step 1 of 5
Download and install an email client that supports IMAP. For this tutorial, we will be using Thunderbird. However, any modern email client will work.
Step 2 of 5
Set up the client to connect to your Transfer Move Email Contents (IMAP).
Step 3 of 5
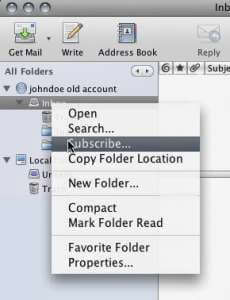
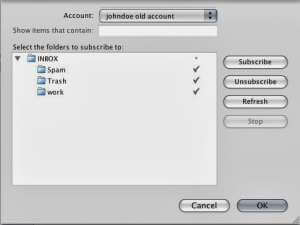
Once the email account has been set up and your “Inbox” has been downloaded, you will want to “subscribe” to this email account. Subscribing to the email account will ensure you also download all of the subfolders you may have created for this account.

Subscribe to this email

Download subfolders
Step 4 of 5
Set up another IMAP email account using the same email client to connect to your new service using the same steps from above.
Step 5 of 5
Copy all of your emails from your old to your new email account by selecting all emails within the Inbox folder and dragging them to the new account. Repeat for each subfolder as well. As stated earlier, copying can take some time. If time is an issue please do this incrementally until all mail has been transferred. After all steps are complete, you can freely remove the older email account from your email client.


